Showing posts with label Our Dwelling Place. Show all posts

Thursday, November 22, 2012

Displayed Art

As promised, here is a look at some ways we display our pastels around the house. In our old house we had one gallery in our dining room. At the new house I've had a grand time decorating and finding places for the kids' work to be displayed. How about a look?


This is my Creative Memories magnetic frame. I wanted it up on the wall, but my scrapbooking things were still packed. So, I made a collage with artwork and some watercolored paper behind it.

I love the way this arrangement turned out by the front door. The photograph is one my mom took (I switch out several of her photos throughout the seasons) and the next one is a frame I picked up and I put I10's pastel leaf in it. The color matches and it looks sweet- the dollar store wallie was a quick add-on.

The original gallery frames- this was a tough one, but I chose to put them on a wall in the kitchen that faces the door we use regularly. It's time to make some new art for these frames. I love that they are "floating frames" so it doesn't matter what size the paper is when you begin (as long as it isn't bigger!).


Remember these pastels? I put them all in the powder room with terrific results. At the time we didn't have more frames so R12 collected some twigs from the yard and we used twine to hang them on the wall. We thought it was lovely, but the wind created by closing the door made it hard for one in particular to stay on the wall!
This week I upgraded to dollar store frames. Even the second hand store over-charged for a used frame so I thought I'd try the dollar store. I bought a nice variety of frames to try. These frames replaced our twigs and twine. I'm looking forward to the Christmas project for the bathroom this month.

This one really makes me smile every time I'm at the kitchen sink! It happens to be just above our instant hot water faucet for tea and coffee. Another second hand frame, it adds such great dimension to the art that our children create.

The best part about decorating with the kids' artwork is that we get to decorate authentically and inexpensively. The children love that their work is there for others to see. It makes me smile to see the fruit of our work together throughout the house. It also makes our art studies and projects more meaningful.

Now that I've just posted about our fall artwork, it's time to get going on our Christmas projects so we can have a seasonal look about the house. I've received frequent compliments on the pieces of framed art we have scattered around the house. I encourage you to look for ways you can decorate using your children's art.

How do you display your kids' artwork in your homeschool?

Monday, November 12, 2012

School Cabinet {Supply Central}

Time for a close up of one of the items in our learning space- the supply cabinet. It's a gift from a friend and so perfect for our needs!

After losing a big, deep closet (not the best space but there was plenty of it), I really needed a large cabinet in which to hide some basic supplies. This lovely early American piece exceeds our expectations for storage. It makes me smile every time I see it or open it.

You know a space is just right when you still smile when you see the inside!


The cabinet is for supplies we use but are not used daily. They are also supplies that fall into the project category rather than just general craft supplies. Those are down in our basement now nearby to tables where the kids can work on their own.


So, what's inside? 
  • paints- we have Colorations temperas in basic primary colors plus black and white for coloring mixing and painting projects.
  • BioColor paints- also from Discount School Supply. These marbleize when mixed and are very enjoyable to paint with.
  • science equipment- stays in the middle on the bottom. Mostly right now this is glassware and pipettes
  • Inherited Art Supplies- from our retired pastor who does a lot of lovely drawing and painting. This is a pretty cool stash that includes lots of pastels, watercolors, and fun paper
  • Paper- we have the letter box of sulphite construction paper, watercolor paper, and plain white sulphite drawing paper in 50lb weight both 9x12 and 9x18 sizes. 
  • Laminator and pouches
  • ProClick Binder and the coils
  • Watercolors- our big box of water color supplies
  • glue and other adhesives, Mod Podge- luv Mod Podge! Also, some Shimmer n' Shine art glaze
  • stamps and other project supplies
  • tissue paper and other small box supplies in a stack
  • a few manipulatives and other misc items
I hope you enjoyed your peek inside this big cabinet. I thought it would be fun to list out some of our favorite supplies.

Stay tuned for more of the INSIDE tour of our learning spaces!

Thursday, November 8, 2012

Our Learning Spaces- A Tour

After much work and rearranging over the last several months, our learning spaces are finally finished! And I've finally acquired all the updated photos and fiddled with them to make them fun and informative. We use the living room and dining room for our devoted learning spaces, but our entire home is a place where we learn together. This post shows our living room and dining room spaces along with a glimpse of the family room, but I will consider a post about our basement (and the kids' rooms) which contains a lot of education potential itself. We have project tables down there, toys of all kinds, and extra art and craft supplies that used to be in our craft closet in the old house.

Here we go, enjoy the tour:

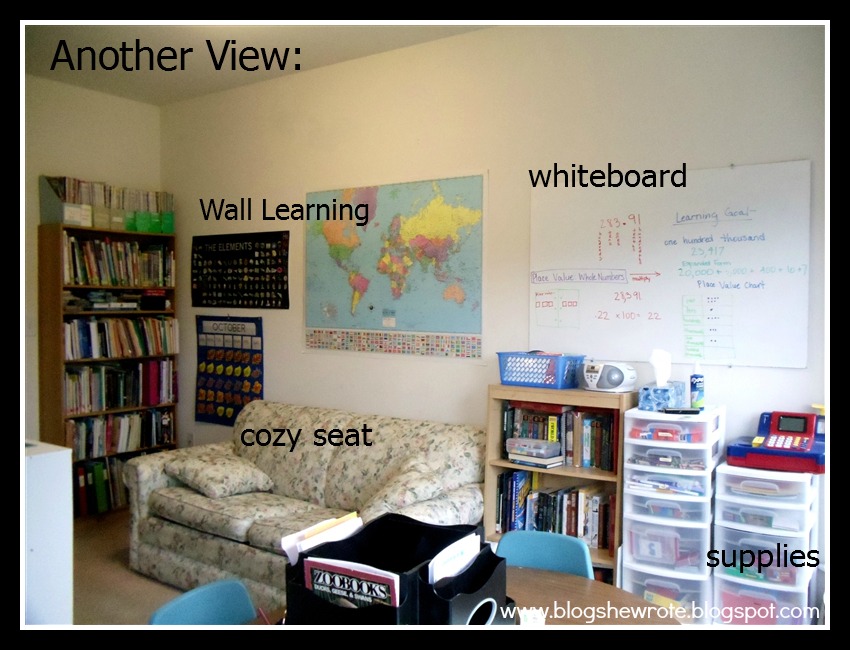
The living room is our main learning space. It has a lovely set of windows to provide natural light to the table where the kids work. You'll see we have a loveseat, lots of bookshelves, and a lot of materials. I had to give up the chalkboard and the whiteboard and stuck with just the whiteboard. The chalkboard is going on the wall in the basement along with our metal wall.


Another perspective... from the front to the back of the room. So many wonderful windows and doorways...cuts down on wall space for furniture and wall hangings! It required some adjustments.


I love the reference and library corner where we have the shelf for reference books and the library shelf with the bulletin board. I love to display work and items related to our studies. A library shelf is a great way to keep all the library books together. If I want to encourage the reading of a particular book or three, I set them out on the shelf or on the coffee table and chances are someone will take notice and read. 


If you follow the Blog, She Wrote Facebook page, then you know I recently scored an IKEA Expedit large shelving unit for $25 on Craigslist. It is a total WIN! It took up all the items from our smaller cubbies and then some. In these pictures you'll see I began to add more and change things around.
 

Every school room needs a flag! R12 and I have been working on a quilted flag and it's all done except for the starts. Which will be buttons. We may go colonial and do 13 or we'll keep on and go with 50. Let's see what buttons we come up with first. I found a large frame at a second hand store and we based the size on the frame we found.


I had a great little art center on the shorter cubbies, but it's split up now. I did reserve a space for the jars to hold our supplies. I love to just pull a jar and put it on the table for the kids to use- we have scissors and highlighters, Ferby pencils, regular pencils, Prismacolors, and some other colored pencils.


The smaller cubbies I decided to put together as an island in the room. It is really a great way to get more stored in the room, but it does take up space. The bonus is the top surface on which I put the cutting mat for fabric and the ongoing sewing projects R12 starts. Underneath we have lots of math manipulatives and other games for learning. I had to have some place to put all the things I had at the perfect height for kids when I had the cubbies on the wall. For now, it's working although we may move where they are in the room for some variety.


What would a homeschooling mom do with her space to work? I was able to snag a corner of the next room we have devoted to our homeschool- the dining room. With the carpet on the floor, we ruled this space out for actual dining. Instead, we have my desk, the school cabinet, a bookshelf, and the student computers in this room.

My corner has my writing desk- a desk I had made by an Amish man when I got my first teaching job along with a small cubby bookshelf to hold all the books I'm working with right now as I plan and implement lessons. I have plenty of bookshelves, but books would pile up around my desk as I didn't want to return them to the shelf across the room only to need them again. On top of the cubbies I have a basket from my classroom teaching days. That is the precise spot where the kids put their work when they are done and I can pick it up to provide feedback. Admittedly, it's a bit school-ish, but it helps me to stay accountable to make sure I look at all their work for the day.


Part of moving to the new house was adjusting to the new space. Of course. I knew we could not fit in as many toys and art supplies as we'd had all in the same place in the old house, so I was on the lookout for a solid piece of furniture to house our art and school supplies. After several unsuccessful attempts to get one from Craigslist, a friend her early American cabinet. Having five children grown up and gone she wanted to know what it was we were looking for to see if she had anything to fit the bill. Did she ever! It is PERFECT and I'll share in another post what's on the inside. It's simply a gem!

Prior to getting that piece, we built the wall shelving unit in that corner. I wanted it fairly close to my desk so the dining room was a good place for it. At the time we didn't know what else we'd end up with so although it's not ideal next to the cabinet, it is doable. One thing I wasn't sure could stay upstairs was the butcher paper roll. We always have fun uses for the butcher paper and after 10 years we finally had to replace the roll! That is a bargain friends. While on the topic, I prefer the 50lb, 24 inch weight paper for wet and dry media. We used to have it on a shelf Dan built for it, but it fits nicely on the floor beneath the shelves in it's dispenser.


The computers are in the opposite corner of the dining room. We have enough room for the printer shelf and the long table. The basket on the floor holds extra cords and controllers and the printer crate shelf (an early marriage purchase from IKEA) holds paper and software. The chairs once belonged to the folks we bought the house from- they left quite a few things for us actually and these chairs are a great bonus.

My favorite part of having the computers here is that they are substantially separated from the school table in the next room. That allows the kids who need to do research or write papers or practice math to work without interrupting the rest of the kids seated at the table working.


Here's another view of the dining room with its openings to both the kitchen and family rooms. Of note is the animal table. The tanks used to be on a dresser in our former dining room which we moved into the boys' room here at the new house- since we actually have room for dressers in the bedrooms! We had not found a good home for the tanks until we started looking for a table to fit in just that spot. Craigslist to the rescue again...the drawer holds the food and with the lid on the crab doesn't go on the second shelf. But we're working on that.


Of course we don't just learn in two rooms of the house. Our home is full of dedicated learning spaces. I'll make sure to share those too, but for now I have just a few. The first is the family room window where I have placed a set of binoculars and a bird guide. We don't have tons of land, but we have wooded property that backs up on an 18 acre park that also has wooded portions. So, the birds do come along with lots of other wildlife.


Throughout the house I have also displayed the kids' art. Below is one example, but in our powder room I have four nails currently holding pumpkin and apple pastel drawings framed in twigs from the yard and twine holding them on the nails. However, I am collecting used frames and use them in different places. I have received a lot of compliments on seeing the kids' work around the house. It's not expensive and speaks volumes to the children about the value of their work.


I hope you've enjoyed your tour of our main learning spaces. I'll definitely come back and post some of the other places we have tucked away and other ways our home places value on scholarly pursuits.

Lastly, I'll share a few thoughts from Sally Clarkson in her book, Educating the WholeHearted Child. In it she emphasizes setting aside a purposeful place for your kids to learn in one room and everywhere so that they will know that math is more important than setting the table for dinner.

__________________________________________

Here's one of my favorite thoughts: "...when one entire room or area is permanently dedicated to home education and other dedicated learning places are strategically located throughout the house, it speaks volumes to your children that their learning is so important that you want to give them special places for it.
___________________________________________

Friday, August 17, 2012

Solar Science

We've been in our new home four weeks as of yesterday. It's hard to believe! Of course, in between unpacking we had a week at the county fair and I was away five days to Dallas. So, it almost doesn't feel that long. One of the fun perks of our new house (there are many) is a handsome set of solar panels. So handsome that the previous owners were power neutral last year- considering the mild winter with no snow cover to speak of. We probably won't make that as we hope there will be snow cover and we have twice the people living here as they did. And some of them leave lights on. Some of them just want all the lights on. Ahem.

But, the solar panels have peaked the interest of especially our engineer J7. He spent some of his birthday money on a new solar kit (he has the Snap Circuits Green set already) and has been enjoying it since. I have to say that these panels provide some amazing learning moments. I'm looking forward to more.

Our new house- the solar panels face the southern sky. Pretty discreet and pretty awesome.

This is the inverter in our basement- you can read the input meter and it tells how much power is being generated and how much we use vs how much we sell back to the power company.

The new Solar Workshop- pretty sturdy and fun to use. The building elements are basically large sized technic lego type pieces- same building system in a larger size really.

One of my Instagram photos (seriously I really do post a bunch to twitter and fb) of J7 building his first mission- a solar tractor!

One day a couple weeks ago we had to have our radon fan rewired (it had been wired to a switch and had gotten turned off) and the electricians were working in our basement. J7 wanted to watch- because there were things happening with electricity- of course. As we were hanging out and observing from afar, the inverter started making a loud buzz. This made us curious. J7 learned that each time the buzz was loud, the number on the inverter readout increased. Then I asked him if it was related to the sun- there were big puffy clouds in the sky that day. Sure enough. When the clouds let the sun through, the inverter went crazy. What a fun find!

Another solar fun fact...we have battery back up on our kitchen and bathrooms which can provide power to those critical places for up to four days if we lose power.

We are still learning about it all- in terms of maintenance and care and all that...but it's a pretty fun thing to have bought with the house! I am certain there will be more homeschool lessons to come from these panels. Stay tuned!

Thursday, August 16, 2012

Getting Settled: Time & Space for Play

Well, this concludes the longest stretch without a blog post on Blog, She Wrote since April, 2007 when my blog began! Where have I been? Unpacking, unpacking, traveling to Dallas for MOPS Convention, and let's see...unpacking! It turns out unpacking takes longer than packing up. We moved to a new home (in case you are not a regular reader) about four weeks ago and we've been working hard ever since. I wanted to post pictures of our new learning spaces for the Not-Back-to-School Blog Hop, but the pictures didn't turn out well and I haven't had a moment to make them right. I really need to find my camera's battery charger. Really.

While I was gone to Dallas for five days, Dan was at home with the kids unpacking and getting things settled. So, of all the rooms to start posting from at our new house...we'll start with the basement! We have a full walkout basement that's pretty large and one corner of it was finished off by the previous owner as a playroom for their daughter. We scrubbed up the tile floor and last week our playroom items moved in. How about those pink walls?!

This table was a gift from the previous owners (they left us quite a few things) and we are using it adjacent to the play area as a project table. There's another project table we cleaned up and use as well. Some of our craft items from our former craft closet will reside here.

Remember our former workbox shelves? They have a new use in our play area! Yay for repurposing!

Kapla blocks were unpacked yesterday and rushed first to the bedroom where the carpet would not do and then down to the play area.

A mansion is born. I love those steps!

More to come, but I thought this post was a fitting one to get me back into the blogging groove. It illustrates perfectly how we are really starting to settle in and make this our home. Free play with imaginative toys! Welcome home everyone!

If you are missing posts here at Blog, She Wrote, don't forget to sign up over at facebook where I have been busy posting through Twitter. I also share things I find around the blogosphere over there. C'mon over!

Wednesday, February 29, 2012

Learning Space Update

So, I've mentioned we are preparing our house to sell. We are down to the wire now, planning to list on Monday. As part of that I went through the school areas in our home and reorganized, move on some things, and even brought in some new equipment for the job. How about a tour?

This was the first place I gave a face lift...the closet under the stairs better known here as the Craft Closet. There was never a door...in case you are wondering and the rack in the front moves so I can access trunks behind it which stores toys. Used to be toy vacation, but now it is toy retirement waiting for grand children. Yes, I just said that.

The game shelves which go all around the perimeter of the room and see the map? Those postcards are from last summer's post card exchange!

Another corner- notice the LEGOS on the floor. The drawers have LEGOS sorted by color and the stacks of boxes are the FLL LEGOS. Dan is teaching a co-op class this semester again so these come with me on Monday afternoons. The home kits are on another shelf. Yes...that is a lot of LEGOS.

The Listening Corner- I really worked on spreading out the items on this shelf so that they are easily accessible. I hoed out a lot of toys and consigned some and gave others away and everything from the kids' younger days is safe in crate storage under our stairs. This was a total clutter win! We still have a lot. nxt kits, snap circuits, and other building toys plus our science kits. You'll find dress up on the hooks and lots of books on CD.
The computer table- this was left on the loading dock on campus one day. Sometimes departments haul out stuff that would work in our space. This was a gem. To be sure I washed it special...never know what a college student might think is fun for a table.

Our new cubbies- these have replaced our workboxes ( a TOTAL clutter bomb in our home) and notice each student has one cubby to call his own.

My bookshelves- full of teaching items and other children's books and more subject area reference material for the kids. The amazing part here is that nothing is on the floor in front of them. Behold....

I used some more shoeboxes to hold books- this is a frequently pinned idea from my blog on Pinterest...I wonder if anyone will pick this new picture up?

The cubby top...home to One Year Adventure Novel, the tool caddy, and various other math fun items.

Our school table- I recently recovered the Desk Apprentice from our microwave cart. Actually, I loved it there, but I thought it would solve a few problems here as well. It's easier to keep the working space neat with a that monster in the middle organizing everything! Each student has a side and they have the pencil cup to the right. Their regular binders go here so they can put away papers without getting up!
The reference rack- this has undergone some changes over the years, but there are some old stand by items on there. The rack was a steal at Big Lots one year.
Laptop central- I haven't quite finished dealing with my desk yet, but it's pretty usable. I just want to keep it real for you all.

That about does it! I will talk more about the cubbies in another post. I was pretty purposeful about using them in a particular way and I will talk about that in relation to our workboxes. I love them and the best part is they will transfer to a new house very easily.

In the meantime, I sure hope potential buyers will enjoy our use of space and um...maybe have some vision for that big screen TV and a sofa they probably want in a family room area instead.

Sunday, January 22, 2012

Contraptions...

Is it any wonder my house looks like a major project is going on? Everywhere. All the time. This is what I'm up against...

This run made possible by the purchase of two marble runs from Discount School Supply.

I'm certain that one day too soon my house will be neat as a pin and I'll wonder where all the messes went. For now...just near my feet in another room upstairs from that one is a pile of Snap Circuits and a half built circuit with an instruction booklet open to just the right page.

That table with the doll house light project is still up and full of items waiting for further inspiration...

And the table in front of me is stacked high with the best loved books. Actually, there are stacks of well loved books everywhere.

Maybe I need to be more mindful about having the children put their messes away. But I prefer to think of our home as a print rich environment with just the right equipment to invite questioning and to inspire investigation. Everywhere. All the time.

Wednesday, July 13, 2011

The Library Shelves

I thought it would be fun to update you on how we're doing with our library book shelf. It.is.awesome. Before this bookcase was in my life all the books you see here were sprawled all along this wall and no...we really didn't have that much better of a place!

During the school year I keep some relevant study items on the top of this shelf. It's perfect! I was also keeping books open for exploration. Right now the stuff of summer is there...R11's seasonal crafts, a bird watching book, a set of binoculars, a whole jug of beads just given to us and a Presidents trivia game.

This is a library book's home away from home. I'm still in love with my $40 shelf from the consignment store. I waited patiently and it paid off!

So, where do you keep library books while they visit your house?

Monday, July 11, 2011

The Card Game Box

Continuing with our game storage boxes, I thought I'd share our new "card game box". These IKEA boxes are just right for consolidating games. When you are a big gaming family like we are, with limited storage space, it's important to think about what's going to happen with all those game boxes! So far, this is a great solution for us. But, you have to be able to part with the original boxes which makes some folks nervous. Also, it sorta kills the resale value I suppose. It's a risk worth taking around here.

I asked the kids to bring out our card games and this was the start. I mean if we could put all those Dominion cards in a box. Why not the regular little games?
Here we are so far, the directions can just sit on top of the box.
R11 helped to make dividers out of index cards. And she took a lovely picture, no?
But I knew we had way more card games than that! Look at all the room I attempted to save! Would card Catan fit in the box? Ticket to Ride card game?
Indeed they do! In the end, we have 15 card games plus a deck of regular cards in our IKEA box. I know we have another Scrambled States card game, but if we find it it might still fit. This doesn't work for cards that are over sized obviously, so test it before you chuck the boxes!
Closed box- I even pulled out my label maker. It's a little scary to throw out the game boxes, but I think the space saving is worth it.

Is this fabulous, or what? I'm excited to be able to take one box and have so many games. This will be great for camping for example and we have a week-long trip next week. Now the directions have become an issue. The Catan card games have huge booklets for directions, so I couldn't fit them into the top of the box. So, I have a 3 prong folder which has the directions to all the games we've transferred to the boxes. After all, the Dominion directions were too wide for the box. I think it works to have them all in one place. I remain convinced this is a great move for us.

I have one more box to share and one box to spare- for our gaming needs into the future!